A website top bar banner is a powerful tool to grab your visitors’ attention, highlight key messages, or promote special offers. With the wiseCampaign plugin by Wisemattic, creating an attractive and effective top bar banner is incredibly simple.
In this guide, you’ll learn how to create them in a few easy steps, whether you are a website owner or just starting off.
Why Use a Top Bar Banner?
Top bar banners are perfect for:
📢 Announcing Promotions or Discounts
📰 Sharing Important Updates or News
⏳ Displaying Countdown Timers for Limited-Time Offers
🚚 Highlighting Free Shipping or Special Services
📝 Collecting Leads or Newsletter Sign-Ups
They are non-intrusive yet highly visible; that is what makes them assure your visitors notice your message without interference with their browsing experience.
What is wiseCampaign?

wiseCampaign is an easy-to-use WordPress plugin for building and managing high-quality marketing banners.
✅ Customizable designs
📅 Scheduling and targeting options
🔗 Integration with marketing tools
🚫 No coding skills required!
Step-by-Step Guide to Create a Top Bar Banner with wiseCampaign
Follow these steps to set up your top bar banner quickly and easily.
Step 1: Install and Activate wiseCampaign

- Log into your WordPress Dashboard.
Ensuring that your WordPress website is accessible as admin.
- Head to Plugins > Enable New Thing.

Select “Add New” and navigate to the “Plugins” section in the WordPress admin menu.
- Search for wiseCampaign

Type wiseCampaign in the search bar and click the Install Now button next to the wiseCampaign plugin.

- Activate the Plugin

Once installed, click the Activate button to enable wiseCampaign on your website.
Step 2: Access the wiseCampaign Settings
- After activation, you’ll find a new menu item called wiseCampaign in your WordPress dashboard.

- Click on wiseCampaign to access the plugin’s settings and features.
Step 3: Select a Pre-mate Top Bar Template
- Select a Pre-mate Template
- Click the “Template” button then Choose a template for your top bar.
- Name Your Template
Give your Template a clear name, such as “Winter Sale Top Bar” or “Free Shipping Banner.” This is for your reference only.
Step 4: Customize Your Top Bar Banner

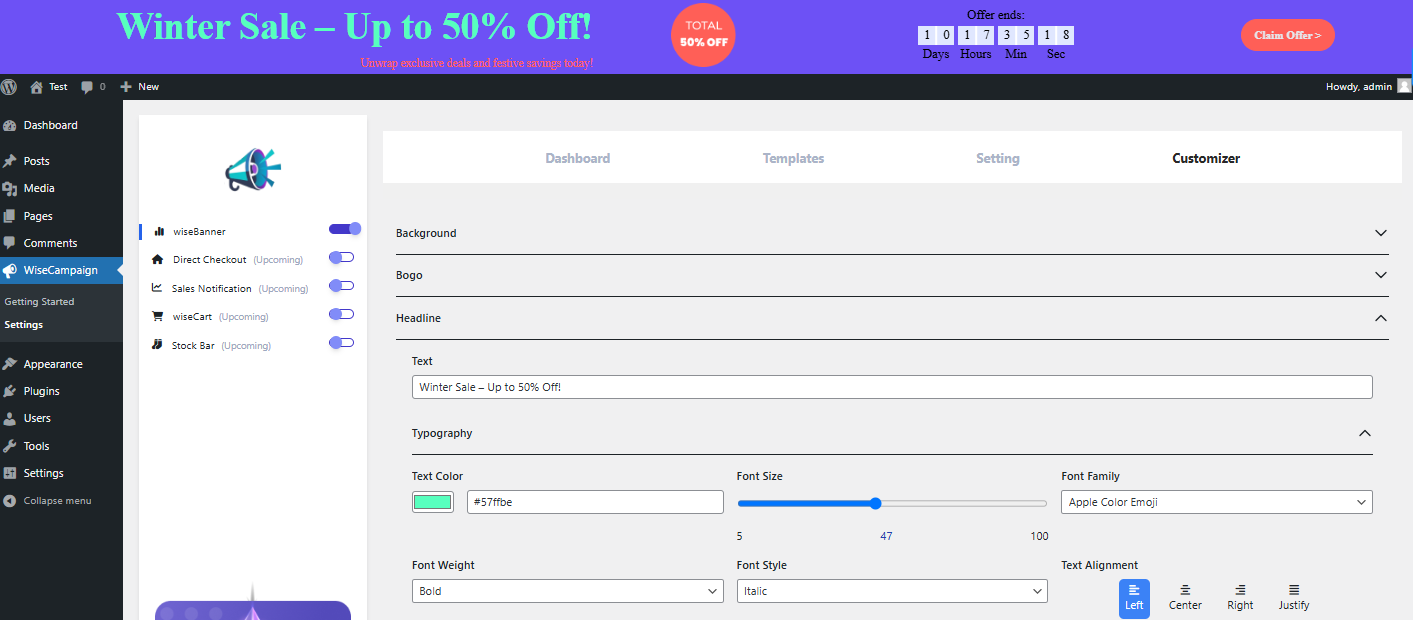
wiseCampaign offers an intuitive interface to design your banner. Below what you can do:
- Choose a Style
🎨 Utilize colors, fonts and layout options that match your website’s theme.
🖌️ Choose from pre-made templates or start with a blank upper bar.
- Add Your Message
Write a compelling message, For example:
🔥 Hurry! 30% Off All Items Until Midnight!
🚚 Free Shipping on Orders Over $50!
📢 Important Update: New Store Hours!
- Make sure to include a standout Call-to-Action (CTA)
Add a button or link to guide users, e.g.:
– ‘Shop Now’
– ‘Learn More’
– ‘Subscribe’
- Add a Countdown Timer (Optional)
If you’re doing a time-sensitive promotion make the countdown timer work wonders.
Step 5: Set Display Rules
wiseCampaign allows you to control when and where the top bar appears on your website. Here’s how to configure these options:
- Page Targeting
Entire website.
Specific pages (e.g., Homepage, Product Pages, or Blog Posts).
Exclude certain pages if needed.
- Audience Targeting
Show the banner to :
– All visitors.
– Logged-in users only.
– Specific user roles (e.g., admins, subscribers).
- Schedule Your Campaign
Set start and end dates for your banner. Perfect for holiday sales or limited-time offers.
Step 6: Preview and Save
- Preview Your Banner
- Click the Preview button to see how your top bar will look on your website. Make adjustments if necessary.
- Save and Publish
- Once satisfied, click Save or Publish to make the banner live on your website.
Step 7: Monitor Your Campaign Performance

wiseCampaign provides analytics to help you measure the effectiveness of your top bar banners. Check metrics such as:
Impressions: Number of times the banner was viewed.
Click-through rate: The total count of visitors who engaged with your call-to-action by clicking.
Conversion rate: Number of actions taken via the banner, such as buying or registering.
Let this information be used to fine-tune your future campaigns.
Best Practices for Creating Effective Top Bar Banners
Follow these tips to make your banners more engaging and effective:
- ✨ Keep It Sweet and Simple: Make your message short and readable in one glance.
- 🎨 Use Bold Colors and Fonts: Make it stand out without clashing with your website design.
- 🖱️ Include a Solid Call-to-Action: Guide visitors on what to do next.
- ⏳ Create a Feeling of Urgency: Use countdown timers or “Limited Time Offer” tactics.
- 🔍 Test and Optimize: Experiment with different messages, designs, and placements.
Why Choose wiseCampaign for Your Top Bar Needs?

Here’s why wiseCampaign stands out:
🛠️ Ease of Use: No technical experience required; perfect for first-time users.
🎨 Custom Options: Create banners that match your brand identity.
📱 Responsive Design: Adapts to any screen size for a flawless look on desktop, tablet, and mobile.
🎯 Advanced Targeting: Deliver tailored messages to your audience at the right time.
💰 Value for Money and Reliable: Exceptional value compared to other plugins.
Final Thought
Creating a website top bar banner with wiseCampaign is a straightforward process that anyone can do. With its easy-to-use interface, powerful features and flexibility, you can quickly set up banners that capture attention drive action and improve your marketing efforts.
So why wait? Download wiseCampaign today and start creating eye-catching top bar banners that elevate your website’s marketing strategy!
If you have any questions or need further assistance feel free to reach out to the Wisemattic support team. Happy campaigning!

Leave a Reply